


Auto-backup
Start new project
Most recent projects
-
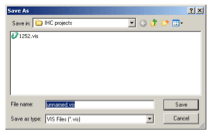
In the menu bar: Select: ‘File’ > ‘Save project as’. The following dialog box will appear:
-
Enter the file name under ‘File name’, e.g. Typehouse_1
- Click on ‘Save’.
Once you have given the file a name, you can save the file at any time by
-
Select ‘File’ – ‘Save’ [Ctrl + s].
It is recommended that you start a new project by saving the project file under a suitable name.
Auto-backup
Every 10 minutes or after ever tenth event (change), IHC Visual will automatically make a backup of your project. You can use the backup file:
-
If your programme or PC crashes.
-
In the event of a power failure.
NB: If you exit Visual using ‘File’ – ‘Close’, you will not be able to use the backup:
The programme will automatically delete the backup file as soon as you have clicked on ‘Yes’ or ‘No’ to save
the project.
Start new project
You start a new project as follows:
-
In the menu bar: Select ‘Files’ – ‘New project’ [Ctrl + N]. You will now see the startup screen.
You can only have one project open at a time
If you already have a project open when you select ‘New project’, IHC Visual will ask whether you want to save the project that is already open before the programme closes the project.
Open a project
-
Select ‘File’ – ‘Open project’ [Ctrl + O]. A menu box with existing files will then appear
under the archive where you last saved IHC Visual files:

Most recent projects
At the bottom of the menu box under ‘Files’, you can see the names of the last four projects you worked
on. All you need to do then is simply click on the name:
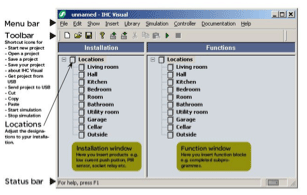
When IHC Visual starts up, two windows with Locations will appear. ‘Location’ is a common term for rooms and places in the installation, e.g. ‘Lounge’, ‘Hall’, ‘Kitchen’, etc.
In order to keep track of the many products that typically form part of the IHC system more easily, it is recommended that you alter IHC Visual’s locations to the locations that are actually present in the installation:
Create location:
-
Right click on 'Locations' and select 'Location'. There is now added a new location with the name 'Location'.
-
Select the newly created 'Location' and press F2.
- Enter the name and any note in the dialog box that appears and exit by clicking 'Ok'.
Change the name of an existing location:
-
Right-click on ‘Kitchen’ – ‘Properties’ for example.
-
Type in the new name.
Delete location:
-
Right-click on the location.
-
Click on ‘Delete’.
If the location contains products, you must accept the following in order to delete the location.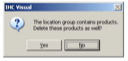
Note that associated commands, conditions etc. which include the products will automatically be deleted.
Insert a Wireless product
Insert special products
Products are divided into three groups:
-
Dataline products (products that are wired to an input module or an output module).
-
Wireless products (transmitters and receivers that communicate directly with the controller).
-
Special products (currently contains only the voice modem and 'RF signal strength test set').
Insert and configure dataline products
Dataline products (wired components) contains four groups:
Dimmer: Here, you select between Dimmer 2-key operation, Dimmer touch, Uni Dimmer 2-key and Uni Dimmer touch.
General: Here, you will find ‘User-defined input product’ and ‘User-defined output product’.
Input (sensors): Select between Gas sensor, IR Receiver, Code keypad, Magnetic contact set, PIR, PIR alarm, Bell push, Smoke sensor, Sabotage circuit, Twilight relay, Status panel, Press 2-key, Press 2-key 1 diode, Press 4-key, Press 4-key 2 diodes, Press 4-key 4 diodes, Press 6-key, Press 6-key 3 diodes, Water sensor.
Output (actuators): Select between Door lock, Light socket, Siren external, Siren internal, Solenoid valve NC, Solenoid valve NO, Output 1-10V, Bell, Socket.
Example: Insert the low current press switch ‘Press 4-key 4 diodes’ in the location ‘Lounge’
-
In the installation window on the left: Right-click on the location ‘Lounge’.
-
Using the mouse, select as shown:

-
[You can however also insert the product as follows:
a. Click on the location ‘Lounge’, so that it is highlighted in blue.
b. In the menu bar: Select as shown on the screendump
‘Insert’ – ‘Products’ – ‘Dataline products’ – ‘Input’ – ‘Low current press switch 2’] - For documentation: Now complete the fields under ‘Product properties’:

- Name: Here, you can see the Schneider Electric name of the product.
Position: Specify where the product is placed. Select from the list (drop-down menu), e.g. ‘Lounge’ or enter text yourself.
NB:: Enter your own remarks here. In some cases, you can also select from a list with standard remarks.
Cable type: Find the cable type that is being used in the list or enter text yourself.
Cable numbering: From the list (drop-down menu), select the number of the cable group to which the product belongs. You can also enter your own text here.
Identification code: Enter the unique number of the product.
Light group: From the list (drop-down menu), select the light group to which the product is to belong.
NB: Not all products have a direct affinity to a light group.
Inputs (from the menu above): Double-click on the individual inputs
(e.g. ‘Upper key, left-hand side’). You can now configure the input for a dataline (dataline 1 in this case) and for an input on the input module (input 1 in this case):
Note that you can see which inputs are in use (in the example above, this applies to inputs 1-4).
You can however perform the configuration of inputs later:
-
Select ‘Configure input’.
-
Right-click on the button itself, e.g. ‘Bottom left’.
-
Select ‘Properties’ and highlight another input and, if appropriate, a dataline.
[Alternative method: Go to the ‘Inputs’ window, highlight one of the press switch’s buttons (e.g. ‘Top left), and right-click on ‘Properties’.]
Note that you can see which inputs are in use (in the example above, this applies to inputs 1-4).
Outputs : You configure outputs in the same way as
inputs. However, under ‘Properties’ you will find:
Initial value: This value is normally set to OFF, which means that the output is NO.
If you select ON, it means that the output is NC.
Insert a Wireless product
Under Wireless products, you will find:
Dimmer: Here, you select between Dimmer 2-key operation, Dimmer touch, Light socket 2-key operation and Light socket dimmer touch.
‘Input’: Remote control, Press 2-key, Press 4-key, Press 6-key.
Combined (combined transmitters and receivers): Here, you select between Combined switch 2-key, ‘Combined switch 4-key, Combined dimmer 2-key 2-key operation, Combined dimmer 2-key touch, Combined dimmer 4-key 2-key operation, Combined dimmer 4-key touch.
Output: Light socket, Socket, Universal relay.
Example: Insert the Wireless product ‘Light socket dimmer touch’
-
In the Installation window: Right-click on ‘Kitchen’.
-
Select ‘Products’ – ‘Wireless’ – ‘Dimmer’ - ‘Light socket dimmer touch’:

-
Complete the fields for documentation (same screen for all Wireless products):
NB: Not all products have a direct affinity to a light group.
Name: This is the type name of the selected Wireless product.
Position: Specify where the product is placed. Select from the list (drop-down menu), e.g. ‘Lounge’ or enter text yourself.
NB:: Enter your own remarks here. In some cases, you can also select from a list with standard remarks.
Identification code: Enter the unique number of the product.
Light group: From the list (drop-down menu), select the light group to which the product is to belong. - Now click on ‘OK’ and the following screen will appear:
The yellow ! indicates that you have not yet linked the product to the controller.
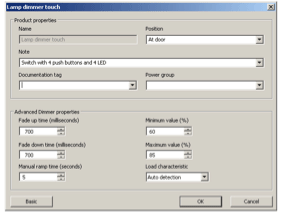
‘Advanced Dimmer properties’
The following applies only to Wireless dimmers:
-
In the installation window: Right-click on ‘Dimmer touch’.
-
Select ‘Properties’ – ‘Advanced’ and the following menu box will appear:

Soft on-time [milliseconds] is the time that the dimmer takes to increase the light to the desired level, e.g. from 30% up to 60% of full luminosity. An adjustment from 10% to 80% for example will also take the set soft on-time. The soft on-time is therefore independent of the start and end level. Set in the range 100 milliseconds – 60 seconds.
Soft off-time [milliseconds] is the time that the dimmer takes to decrease the light to the desired level, e.g. from 60% light down to 30%. An adjustment from 80% to 10% light for example will also take the set soft off-time. The soft off-time is therefore independent of the start and end level. Set in the range 100 milliseconds – 60 seconds.
Manual ramp time [seconds] is the time it takes for the light to ramp from min. to max. light or vice versa. Set in the range 2 seconds – 10.0 seconds.
Minimum value: The lowest level [% of max.] that the light can be decreased to, e.g. 30%. Set in the range 0% - 100%.
Maximum value: The highest level [% of max.] that the light can be increased to. Normally set to 100%. Set in the range 0% - 100%.
Load characteristics Here, in the drop-down menu you select the type of load to which the dimmer is connected: Inductive, Capacitive or Auto (which means that the dimmer will automatically determine the type of load to which it is connected).
Insert special products
This group only contains: Modem and 'RF signal strength test set'.
Example: Insert a modem in the location ‘Lounge’.
-
Right-click on the location ‘Lounge’.
-
Select as shown:
-
Fill in the menu box that appears ‘Modem properties’:

Modem properties:
Name: This is the type name of the modem.
NB:: Enter your own text or select from the list if possible. The note will be shown in ( ) after ‘Name’.
Position: Here, you specify the position. Select from the list (drop-down menu) or enter text yourself.
Identification code: Enter the unique number of the product.
Cabling
Wire colour 0 V: Select the colour for the 0V supply.
Wire colour 24 V: Select the colour for the 24V supply.
Wire colour RS485 minus: Select the colour for RS485 minus.
Wire colour RS485 plus: Select the colour for RS485 plus.
Telephone numbers
Number 1: Here, enter the first number that the modem is to dial.
Number 2: Here, enter the number that the modem is to dial if number 1 is not answered.
Number 3: Here, enter the number that the modem is to dial if number 2 is not answered.
Number 4: Here, enter the number that the modem is to dial if number 3 is not answered.
Settings
Access code Enter a 4-digit access code which is to be used when dialling the IHC system. The default code is: 1234.
Call pause [minutes]: The pause that is left between dialling of the specified telephone numbers. Example: The modem dials telephone number 1, which is not answered. The modem then waits the specified number of minutes before dialling telephone number 2. Set in the range 1 – 99 min. (whole number of minutes).
Call delay (seconds): The time it takes for the modem to ring in the event of a call. Set in the range 1 – 99 secs.
ID code: Here, you enter an ID code which is to be used for a security control centre. This will then be able to see where the alarm call is coming from.
Number of rings: Here, you enter the number of times the telephone should ring before the modem must answer. For use when calling the modem from an external location. Min. number of rings: 0. Max. number of rings: 9.
NB: If you sent ‘Number of rings’ to 0, the modem will not answer. - After setting up the modem: Click on ‘OK’. The following screen will appear:

Inputs 1-8: Remember that in IHC Visual, the term ‘Input’ refers to the fact that there are inputs for function blocks (the controller), i.e. outputs from the modem. When you control an output from the IHC system in the modem’s telephone menu, it will be one of these function block inputs that is triggered.
Outputs 1-8: These eight function block outputs are modem inputs, which you can determine the status of in the telephone menu.
Alarm: The modem has eight alarm flags. Here, you can “bind” eight different alarms from function blocks.
Alarm active: Here, you “bind” an input on an alarm block if you want the modem to reset the alarm after you have acknowledged in the modem.
Cancel alarm: Here, you “bind” an output on an alarm block if you want to stop the modem so that it stops dialling.
What is a function block?
A function block is a small programme, which can perform a particular function in your IHC project:

Preprogrammed function blocks
We have preprogrammed and tested a series of function blocks. These function blocks have been placed in the following folders in IHC Visual:
-
‘Favorites’ (You can edit in the folder – see the section entitled ‘Create your own function blocks’)
-
‘Light control’
-
‘Time, clock and calendar’
-
'Blinds and shutters'
-
‘Special functions’
-
‘Heat control’
-
‘Alarm’
-
- (Reserved for your own blocks)
-
‘Standard blocks’ (blocks belonging to Schneider Electric).
Together, these function blocks meet most control needs in a IHC system.
You insert the function blocks as follows:
- In the function window: Right-click on the location where you want to insert the function block, e.g. ‘Lounge', ‘Bathroom’ or your own location.
- Select from the list.
Example: Insert the function block ‘Toggle block with on, off and timer function’:
